LED Sequencer Circuit
CKT Pending replacement.
The above circuit is what could be called a LED Sequencer circuit. The circuit consist of a basic clock circuit U4, using a common 555 Timer chip. Resistor R1 adjust the frequency of the pulses available at U4 Pin 3 the output. The clock pulses are fed directly into U3 A&B a quad nand gate. The output pins of U3 A&B will toggle, allowing the clock pulses to output from either pin 3 or 6 depending on the output states of U2. The clock pulses from U3 pins 6&3 are fed directly to U1 a 74193 a BCD 4 bit up / down counter. U1 will either count up or down depending on whether the clock pulses are applied to pin 4 or 5 as the other pin is held at a logic low. U1 provides a binary output to U2. U2 is a 4 line to 16 line decoder chip. As the count increments on the input pins of U2, the outputs will sequentially go logic low. The result is the LED's will turn on and off in sequence in a sort of back and forth sequence.
Note: I just noticed I omitted the power pin on U2. That would be pin #24.
All of the chips used in the circuit (with exception of U4) are TTL and run off a 5.0 volt power buss. U4 although not a member of the TTL family will also run just fine off a 5 volt supply. Resistor R1 is used to adjust the frequency of the clock and will allow the rate the LED's change at to be adjusted. The actual timing is accomplished by R1, R2 and C1. The circuit uses basic red LED's, however, just about any general purpose LED will work. Should you choose another color, be sure to change the value of R3. Typically blue LED's for example would require a lower value of around 330 or 220 ohms.
Note of importance 2/25/06
The pin out of the 74154 chip in the above image is incorrect. This just came to my attention. Note that pin 14 is shown as common and again shows up as an output (Y12). Pin 14 of this chip is not common. Pin 12 is common of this chip. I suggest using the link for the PDF file on this chip located below. Many thanks to a Maximum PC forum reader for bringing this to my attention. As time allows I will get a new and correct drawing posted to this page. Additionally I found an excellent rendition of this same circuit including a parts list here.
Ron
The following are links to additional data on the chips used.
74154 4 Line to 16 Line Decoder
The Result Should Do This

Another Variation
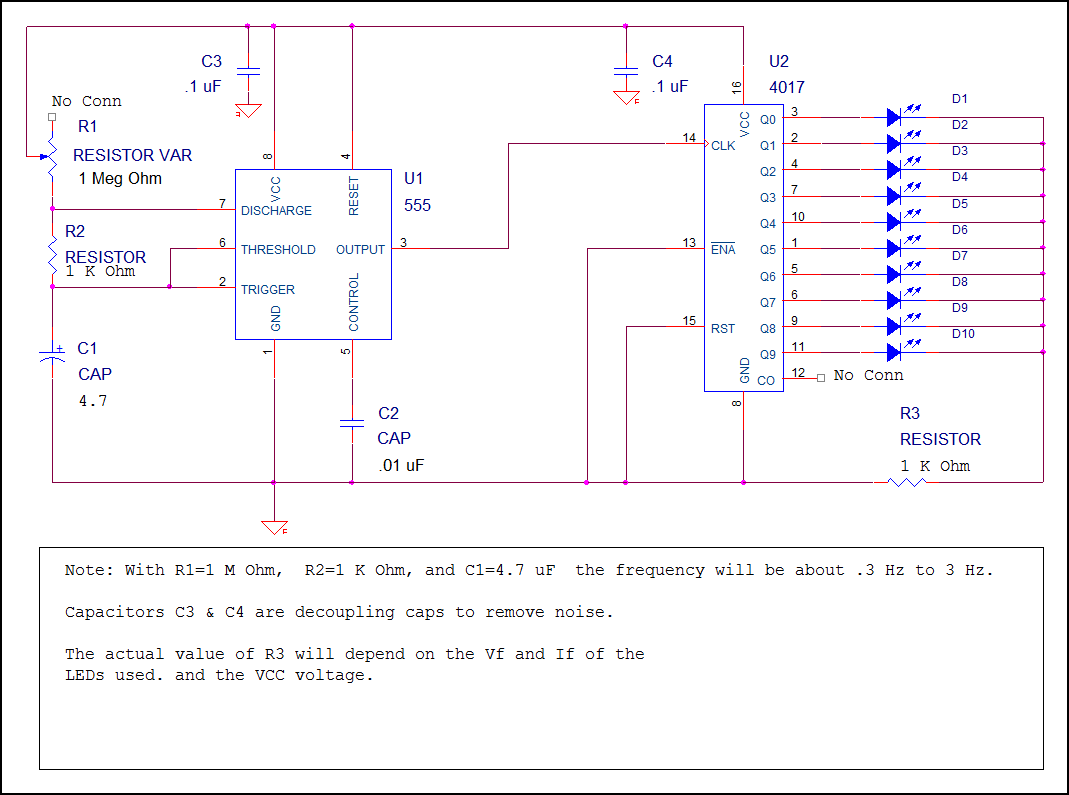
The above circuit is another variation of a basic LED sequencer circuit. Note again the use of the 555 as a clock. The 555 is likely one of the most versatile chips ever invented. The output of the 555 is coupled to a 4017 Decade Counter Divider another very widely used chip. Notice in the above circuit pin 12 CO (Carry Out) is tied back to pin 15 the Reset. The counter will sequentially count up to 10 and start again. Note that unlike the previous circuit the LED's are connected with the Anode (+) side to the output pins. This is because the outputs sequentially go "High" rather than low as in the previous circuit. The reset pin 15 could be tied to any of the output pins to get a "Divide By" function.
The following are links to additional data on the chips used. Omitting the 555 as used above:
The Result Should Do This

These pages are still in work!
A few typical examples of mixed sequencing:

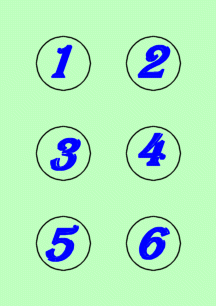

When considering messing with "Chasing LED'S" the patterns can be varied not only by the electronic building blocks but the placement of the LED'S as well. Patterns can be configured in Rows and Columns as above. However visually pleasing and interesting effects can also be accomplished using patterns such as circular and triangular. The possibilities are limited only by imagination and the digital building blocks employed in your circuit designs.
And Yet Another Variation
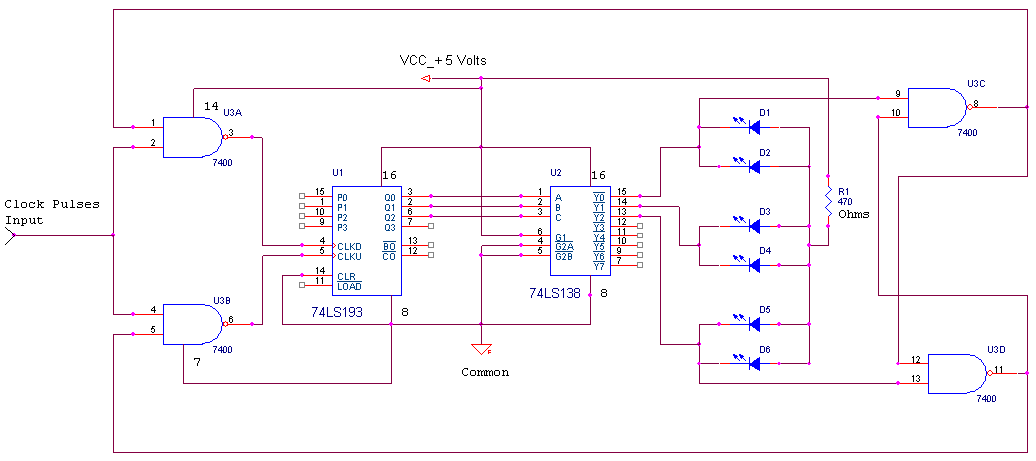
The above circuit, much as the previous circuits will sequence the pairs of LED'S (D1&D2, D3&D4, D5&D6) in a back and forth sequence. This circuit employs a 74LS138 3 Line To 8 Line Decoder. Unlike the use of the 74154 in a previous circuit, the 74LS138 is a smaller and easier to mount chip. The clock pulses can be provided by the 555 Timer circuit used in the above drawings. Note that the LED'S used should be low current >20 Milliamp LED'S. To drive a larger load or larger LED'S transistors should be employed as drivers for the LED'S.
74LS138 3 Line to 8 Line Decoder
A General Note About LED'S
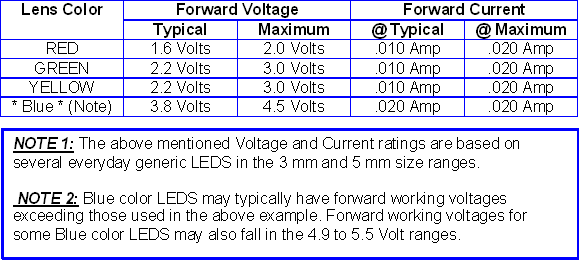
Common questions forever surround the LED. A frequent question is what is the correct LED voltage? A common answer could be there is none! The above table shows some very generic LED'S and some of the voltages associated with them. Note that the normal forward working voltages vary with the color of the LED. To limit the current through the LED a resistor is frequently placed in series with the LED. The purpose of the resistor is to limit the current flowing through the LED to a safe level. To determine the value of the needed resistor we would employ a little derived ohms law.
More to follow later... 2/26/06
LM317 Positive Adjustable Voltage Regulator Basic Circuit
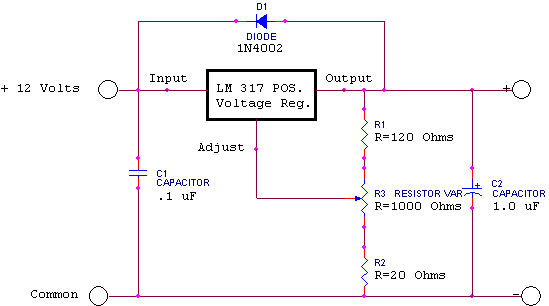
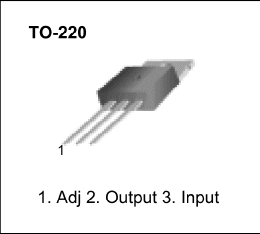
The above circuit can supply up to about 1.5 Amps of current when a small heat sink is attached to the tab. The LM317 comes in a variety of case designs with the common TO-220 shown above. The LM317 is actually a 1.2 to 37 Volt regulator. The above circuit uses a 12 Volt input and the output will vary between about 1.2 and 10 Volts. All resistors are rated at 1/2 watt and the capacitors are more for show than for go. If the regulator is placed close to a clean DC source C1 can be eliminated as it acts as a small noise filter. The purpose of C2 is to aid in keeping the output constant. Diode D1 is there for reverse polarity protection. Thus it can be seen the LM317 Voltage Regulator will function fine with a minimum of external components. Resistor R3 a variable 1K Ohm resistor adjust the output voltage.

26 LED CIRCUIT (PARALLEL)
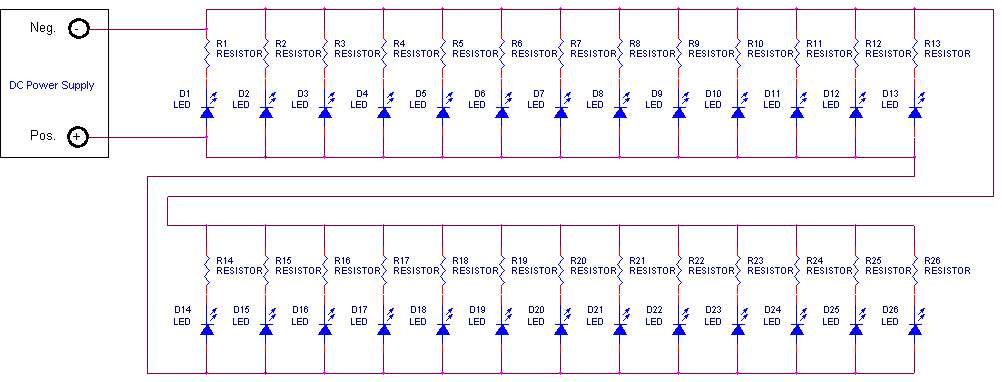
The above circuit has a total of 26 Light Emitting Diodes wired in a parallel configuration. The LED specifications are as follows:
SOURCE MATERIAL:InGaN
EMITTING COLOUR:BLUE
LENS TYPE:WATER CLEAR
LUMINOUS INTENSITY-MCD:10000 TYPICAL/13000MAX
REVERSE VOLTAGE:5.0 V
DC FORWARD VOLTAGE:3.3V TYPICAL/ 3.5V MAX
DC FORWARD CURRENT:20mA
VIEWING ANGLE:+/-20
LEAD SOLDERING TEMP:260oC for 5 seconds
Since each LED has a forward current of 20 milliamps (.020 Amp) the total circuit current will be about 520 milliamps (.520 Amp). The forward working voltage of each LED is typically 3.3 Volts. The purpose of resistors R1 through R26 is to limit the current through each LED depending on the applied voltage from the DC Power Supply. The value of the resistors is calculated as follows:
For a 5 Volt Supply: 5 - 3.3 / .020 = 85Ω (Ohms)
For a 12 Volt Supply: 12 - 3.3 / .020 = 435Ω (Ohms)
Without doing more math a 1/4 Watt carbon resistor will do just fine. Now there is a minor problem here. Unless we find very fancy precision resistor we have to use off the shelf values. For the 5 Volt Supply either a 82 or 91 Ohm resistor will work just fine and for 12 Volts a 470 Ohm resistor will work just fine. These resistors typically have a tolerance of + / - 10%.
.